Kenmore 117 series needle bar box
Last Update: 2024-06-18
It’s not uncommon for the needle bar area on a sewing machine to have a face plate that can be easily removed, or even have a hinged access door that can be opened and closed without even needing to remove a screw. With these machines even if you don’t know too much about the mechanics of a sewing machine, you’re still probably familiar with what’s in there.
On the other hand, if you use a vintage Kenmore series 117 series rotary sewing machine, there’s a pretty good chance you’ve never seen the inside of the needle bar box.
Example machine for this article
In this article I’m using a Kenmore 117.959 rotary as an example. The other rotary machines in the 117 series are similar, but not necessarily the same. This article can also be used for many of the vintage rotary sewing machines manufacture by the White sewing machine company.
What’s in the box?
The needle bar box on the Kenmore series 117 series rotaries contains the same things you’d normally find under the needle bar cover plate of most other sewing machines, but when you remove the needle bar box from your rotary machine the needle, and presser bars, the presser bar pressure adjusters, the tensioner assemblies, and the presser foot lift lever are all removed with the needle bar box as a unit.
How to remove the needle bar box
It isn’t too difficult to remove the needle bar box from these machines. Unplug the machine from the wall. Unthread and remove the needle from the machine. On the back side of the needle bar box there are two holes. The upper hole is used for adjusting the height of the needle bar, and outside the scope of this post, but the lower of the two is the rear needle bar box attachment screw. If you have trouble removing this screw because your driver is too long or because you’re unable to turn it, you may need to use a 1/4 inch box wrench and an appropriate sized driver bit to have enough leverage to remove it.
After you’ve removed the rear needle bar box attachment screw, while holding onto the needle bar box so that it doesn’t drop, remove the front needle bar box attachment screw.
Gently pull the needle bar box away from the machine, but if it feels like it hung up then stop. Make sure the needle bar box is able to clear the thread take up arm as you remove the box. If it isn’t, turn the handwheel until it will clear.
If the needle bar box still feels stuck, gently rock the top and bottom of the needle bar box to free the needle bar link from the needle bar block, or the take up cam needle bar link post. Note: The needle bar link is made of cast iron and be easily broken.
A look inside the box
Congratulations, you’ve dug farther into your Kenmore series 117 series rotary farther than most people. The needle bar area of these machines require the same amount of cleaning and lubrication as any household sewing machine, but there’s a good chance your machine hasn’t been opened up like this since it left the factory.
You don’t really need to remove the thread take up arm like I did here, but you do need to clean the contents needle bar box and the end of the machine that the box attaches to.
How to put it back together
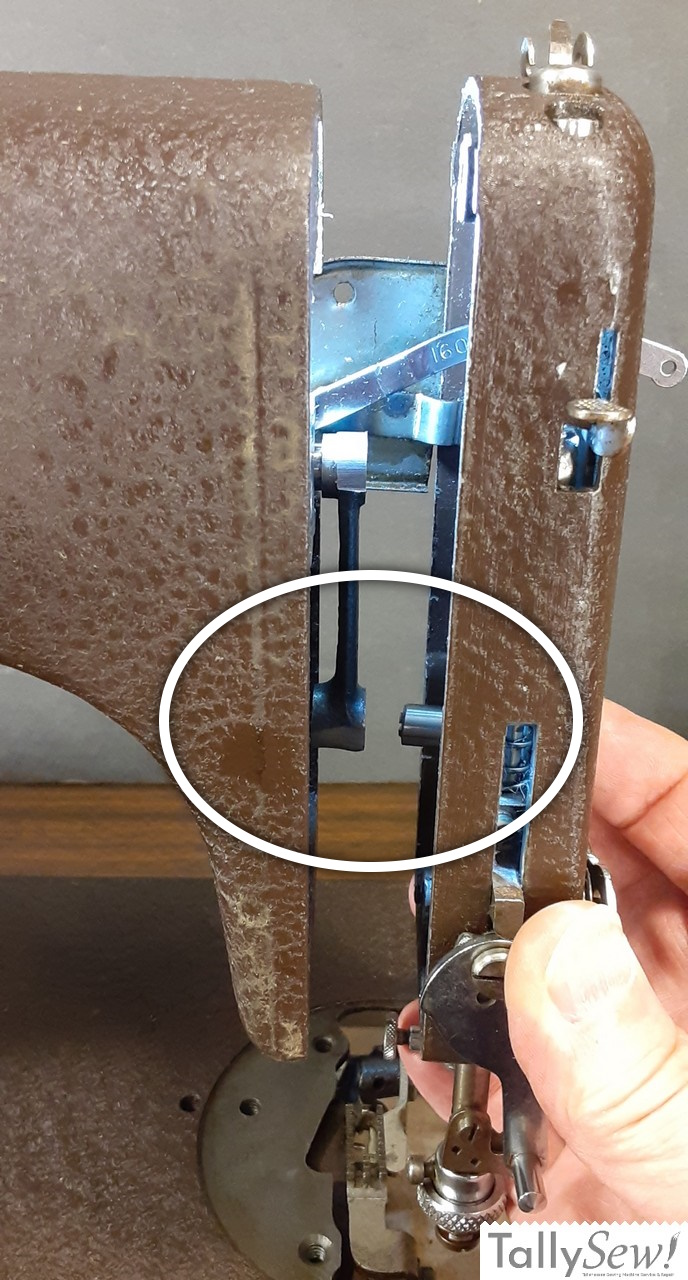
Hang the needle bar link on the take up cam needle bar link post with the 15 facing out (see photo). Have the front needle bar box attachment screw handy… fit the thread take up arm through the slot in the needle bar box and position the hole in the needle bar link so that it go onto the stud. You may need to move the needle bar up or down to help get things in position.
When it’s lined up, screw the top on loosely with the front needle bar box attachment screw, and then on the other side use the rear needle bar box attachment screw. Snug the front and rear needle bar box attachment screws, but don’t overtighten. If you’re unable to attach the needle bar box in the correct position, stop and find out why. Do not use the screws to force it to fit.
Once it’s back together and before installing the needle, slowly turn the hand wheel a few time to check for any binding. If the wheel turns correctly you can rethread etc and test the machine, but it’s a good idea to make the first few stitches by turning the wheel by hand.